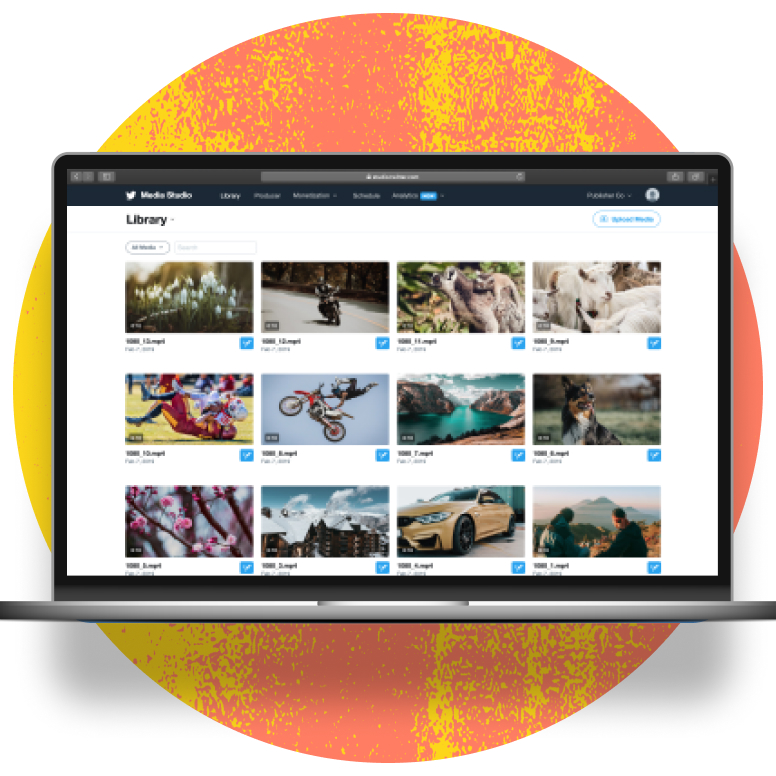
Library
The Library is Media Studio’s home page, where you can scroll through your media library, search your content, filter (by file type), upload new media, edit metadata, review analytics, and much more.
Here you will be able to see all your videos, GIFs, and image assets that you’ve shared from your Twitter account. This includes media assets that are Tweeted directly from your account and/or that are uploaded via Media Studio.
1. Uploading
How to upload media to your library:
- Ensure you’re logged in to Twitter and viewing studio.twitter.com.
- Click the Upload Media button at the top-right of the page.
- Select the media you want to upload from your computer.
- Once your media has been selected, upload will start automatically.
Tip: You can select as many files as you’d like, including various media types, per upload.
2. Content Settings (Metadata)
How to modify media metadata:
- Click on the media you wish to modify within your Media Studio Library.
- Click the Settings tab.
- You can update the following types of metadata (optional):
- Title
- Description
- Call-to-action URL
- Open Content restrictions of you need to enable video geo-restrictions:
- Include
- Exclude
Tip: Title and description fields only appear to people viewing your video via desktop; these fields are not visible on any mobile platform.
Tweet metadata
The following settings can be applied, edited, or removed at any time by clicking into the media you wish to modify, though any changes will not be reflected on previously created Tweets.
- Title: Appears directly below the video (when set), and can be seen via Timeline on desktop or within the Tweet Detail view on iOS and Android.
- Description: Appears below the Title (when set), and can be seen via Timeline on desktop or within the Tweet Detail view on iOS and Android.
- Call-to-action: Appears as a floating button on top of the video across desktop, iOS, and Android. Tapping on the CTA button will send the user to your website.
- Tags and categories: When monetization is enabled, this data helps us match your content to the best ads in our marketplace.
Content settings
The following settings can be applied, edited, or removed at any time, and any changes will be reflected on previously created Tweets within a few minutes.
Geo-restrictions: The content restrictions functionality, also known as geo-restrictions, allows the viewing of videos to be limited to specific countries you select upon Tweeting. This setting can either be enabled on by Including or Excluding a set of countries, like:
- US-only video: Include US
- Everywhere but US video: Exclude US
3. Tweeting
How to Tweet media from your Library:
- Click the Tweet button under the media thumbnail.
- Within the Tweet compose window, enter your Tweet copy (up to 280 characters).
- Click the Tweet button to immediately publish your new Tweet.
Tip: If you would like to create a Tweet that does not appear on your timeline, select the Promoted-only checkbox.


- Click the Tweet button under the media thumbnail
- Within the Tweet compose window, enter your Tweet copy (up to 280 characters).
- Click the Tweet button to immediately publish your new Tweet.
Tip: If you would like to create a Tweet that does not appear on your timeline, select the Promoted-only checkbox.
Tweet Scheduling
How to schedule a Tweet from your Library:
- Click the Tweet button under the media thumbnail.
- Within the Tweet compose window, enter your Tweet copy (up to 280 characters).
- Click Schedule at the bottom of the dialogue box.
- Within the data picker that appears, select both date and exact time (shown in your current timezone).
- Click the Done button to save the scheduled Tweet.
- At your selected date and time, Media Studio will publish your Tweet.
Note: To view all scheduled Tweets, click on the Schedule button within the top navigation bar.
4. Media Sharing
In Media Studio, media can be shared across multiple Twitter accounts to streamline how your share your videos.
How to share media to another Twitter username:
- Click on a media within your Media Studio Library.
- Click the Sharing tab.
- Start typing in the username of the person you would like to share the media with.
- Click on the correct name that appears in the dropdown.
- If you need to remove shared access, click on the delete icon next to the associated username.
How to manage media shared via Media Studio:
- Click on the dropdown next to the Library header under the navigation bar.
- Click on Shared Media.
- Manage and create Tweets via shared media within this view.


- Click on the dropdown next to the Library header under the navigation bar.
- Click on Shared Media.
- Manage and create Tweets via shared media within this view.
Note: All Tweets created via this method will include attribution to the original owner of the video (the username that originally shared the video).
All analytics on shared views will only be visible by the original owner of the video (the username that originally shared the video). If Tweets were sent out from multiple Twitter accounts, all view counts and other metrics will aggregate on the video within the owner’s account.
For more information on Analytics, visit this page.
5. Library Upload Specifications
These instructions are only valid for Media Studio, and should not be followed for usage of the Twitter developer API, Pro Media API, desktop upload, or mobile upload.
Video:
File size and type
Maximum file size: 1 GB
Type: .MP4, .MOV
Resolution:
Recommended resolution (landscape): 1280x720
Recommended resolution (square): 720x720
Encoding
Video specification: AVC encoding (H.264)
Recommended video bitrate: 5-8 mbps
Maximum video framerate: 60 FPS
Audio specification: stereo/mono AAC (LC)
Subtitles: CEA 608/708 embedded, .SRT sidecar
Duration:
Most users are limited to 2:20 (140 seconds), though some partners are allow for video duration up to 10 minutes.
If you would be like to be allowed to upload > 2:20 minute videos (up to 10 minutes), reach out to your Twitter account manager.
Image:
File size and type
Maximum file size: 20 MB
File type: .JPG, .PNG
Resolution:
Maximum resolution: 8192x8192
GIF:
File size and type
Maximum file size: 15 MB
File type: .GIF
Resolution:
Maximum resolution: 2048x2048